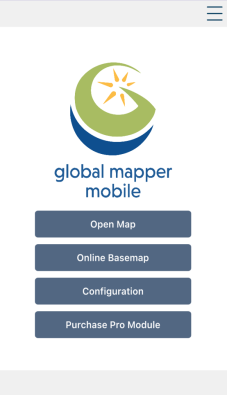
Quick Start Guide
Global Mapper Mobile® is an app that allows you to take your Global Mapper® desktop data into the field on an Android or iOS device to gather additional information. Data collected or edited in the field in the Global Mapper Mobile app can then be exported for further processing in Global Mapper desktop. Field data may consist of GPS track features, photos taken with your mobile device, feature attribute values, and more. New features created in Global Mapper Mobile may be added using feature templates defined in Global Mapper desktop, making remote data collection easy.
Getting Started
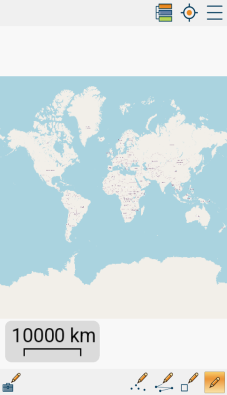
The Open Street Map basemap layer is accessible directly from the Start menu in Global Mapper Mobile. You may use this map immediately to explore the features of the app. To load this map, tap Online Basemap from the main screen of Global Mapper Mobile. In the Initial Layer Bounds dialog, select Full Source Bounds. The Open Street Map basemap will be displayed.
Pan
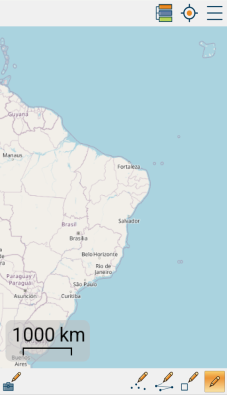
Touch and drag the screen to pan over the map.
Zoom
Use a pinch gesture to zoom in and out.
 Coordinate Display
Touch this button and select GPS and Crosshair to display your location on the map. A dot indicates your location, and an arrow indicates your heading. A larger, translucent circle may also be visible, indicating the current GPS location accuracy. The Latitude and Longitude are displayed on the bottom of the screen. when enabled, a crosshair symbol will be placed at the screen center. The Latitude and Longitude of the crosshair center are displayed on the bottom of the screen.
 Control Center
Touch this button to display the Control Center dialog. Like in Global Mapper desktop, the Control Center shows the various map layers in the open project. From the Control Center you may hide layers, change the ordering of the layers, edit the layer name, and display the layer metadata.
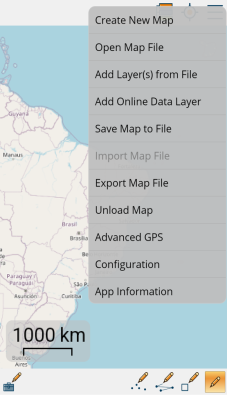
 Main Menu
Touch this button on the upper left corner of the app screen to view the main menu. Tap Open Map File to view a list all the map projects in your package directory, and then tap a file to load. After making edits to a map, tap Save Map to File to save the map. See the File Sharing topic below for instructions on how to import and export package files. Tap App Configuration to change settings for Global Mapper Mobile, more information on the settings is available in the online help.
 Digitizer
In the bottom left corner of the screen you will see the icon for the Digitizer tool. Along this bottom bar you will see icons to create features and edit existing features.
 Feature Properties
Touch this button to enable/disable the Feature Edit tool. The button will be tinted orange when enabled. Tap a feature, any country in the Getting Started project, to select. As with Global Mapper Desktop, the feature will be highlighted. Tap a feature to select. Tap the feature again to display and edit the feature properties.
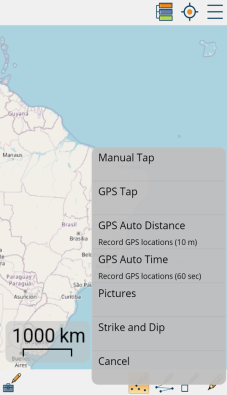
 Create Point Features
Touch this button to enable the Create Points Digitizer tool. Four creation modes are available:
Manual Tap – Tap the map location where you would like to place a point feature. The Feature Properties dialog will be displayed allowing you to specify the feature type, name, layer, etc.
GPS Tap – Tap the screen anywhere and a point feature will be created at your current GPS location.
GPS Auto Distance – In this mode, a feature point will be created each time your location changes by a specified distance, configured in the application settings. Touch the Points button again to disable.
GPS Auto Time – In this mode, a feature point will be created at a specified time interval, configured in the application settings. Touch the Points button again to disable.
Pictures – Choose an image from the device and a picture point feature will be added at the location determined from the EXIF information in the image.
Create Quick Picture Points with any tool selected in Global Mapper Mobile by long tapping anywhere int the map view. This will launch the camera on your device where you will be able to capture an image. A picture point will then be created at the location determined from the EXIF information in the image.
Strike and Dip – Pro Module License Required – Create a Strike and Dip feature at the GPS location using the magnetic and accelerometer/gravity sensors in the device. To create a strike and dip feature lay the device on the sloped surface, and tap to create the point. The dip, dip azimuth, and strike azimuth will be saved as attributes.
 Create Lines
Touch this button to enable the Create Lines Digitizer tool. Line features can be created using one of five create modes: Manual Tap, GPS Tap, Trace, GPS Auto Distance and GPS Auto Time. Instead of creating individual point features, you will be creating vertices in a single line feature. When creating lines, two buttons will appear on the lower left of your screen. The  confirm button is used to complete the line feature. Double tapping the screen or touching the lines button again will also complete the feature. The
 undo button removes the last vertex from the pending feature.
 Create Areas
Touch this button to enable the Create Areas Digitizer tool. It works the same way as the create line tool described above using the confirm button to complete the feature and theundo button to remove the last added vertex. Create Areas support options for Manual Tap, GPS Tap, GPS Auto Distance and GPS Auto Time.
 Toolbox
Tapping on the selected tool will open the Toolbox where you can then select a different tool to use in the Global Mapper Mobile app.
Digitizer
Create new features and edit existing features on the loaded map.
Measure
Measure distance using a crosshair icon on the screen to determine start and end measurement points.
Raster Info
Select a pixel in a raster layer to view additional pixel information such as elevation or RGBA values.
Volume - Pro Module License Required
With an elevation grid layer open, select and use a vector area feature to calculate cut and fill volumes. Choose from one of three different methods for calculating the base elevation(s) of your area feature.
Viewshed - Pro Module License Required
Based on a loaded elevation layer, Viewsheds can be created from a selected existing point feature or based on your current location.
Contours - Pro Module License Required
Using a loaded elevation layer, equally spaced contour lines can be generated.
Search Features
Search for loaded vector features based on name, description, or attribute values.
Search Address - Pro Module License Required
Search for an address, city, county, or state anywhere in the world.
GPS Average - Pro Module License Required
Average readings of the GPS location to increase accuracy.
File Sharing
Map data for use in Global Mapper Mobile should be in the Global Mapper Mobile Package (*.gmmp) format. These files can be created in the Global Mapper desktop application using the Mobile Data Management tool or the File > Export > Export Global Mapper Mobile File… option. There are several ways to transfer files to and from your (Undefined variable: Variables.MobileDevice) device.
Files can be shared between a computer and (Undefined variable: Variables.MobileDevice) device using Global Mapper desktop's Mobile Data Management tool, email, shared drives, or a USB sync cable to connect the device. To email a map or upload it to a file location from Global Mapper Mobile, select Export Map File from the Main Menu, or use the vertical dots next to the map name listed on the Open Map File list.
Mobile Data Management
Use the Mobile Data Management tool in Global Mapper desktop to wirelessly transfer a (Undefined variable: Variables.PackageFile) to a mobile device. For wireless data transfer through this tool the computer running Global Mapper desktop and the (Undefined variable: Variables.MobileDevice) device with Global Mapper Mobile must be connected to the same wireless network. Additionally the Global Mapper Mobile App Configuration option Enable Device Discovery must be active. The Mobile Data Management tool is accessed from the Tools Menu in Global Mapper desktop.
Transfer package files as email attachments. Most Android email clients, such as Gmail, will allow you to automatically launch Global Mapper Mobile and load the package by tapping on the attachment. You may also save the attachment to a directory on your device. Likewise, you may send modified (Undefined variable: Variables.PackageFile) as email attachments directly from Global Mapper Mobile.
Shared Drive App
Download files from Google Drive, Dropbox,
USB Sync Cable Transfer
Connect your Android device to a PC with a USB sync cable to copy files to and from the internal storage folder using Windows File Browser. By default Android version 11 and newer will save restrict Global Mapper Mobile's access to the app specific folder. Enable the Allow Management of All Files app permission in your device settings to access files saved to Documents and Downloads folders.